What is the Agent Studio?
The Agent Studio is your hub for creating, organizing, and managing AI agent automations. It supports multiple types of items and several ways to create agents, from visual workflow building to AI-powered generation.Agent Studio is a full workspace: create agents, define custom tools (MCP servers), build knowledge bases (vector stores), organize everything into folders, and share with your team.
What You Can Create
Agent Studio supports four types of items:GUI Agent
Visual workflow editor: chain together steps like navigation, clicks, data extraction, loops, and conditions
Python Agent
Code-based agent using the Narada Python SDK: full programming flexibility with loops, APIs, and data processing. See Python Agents
MCP Server
Custom tool definitions using the Model Context Protocol: create reusable tools your agents can call. See MCP Builder
Vector Store
Knowledge base with document upload and semantic search: give your agents access to custom knowledge. See Vector Stores
Ways to Create Agents
Agent Maker
Describe your goal in natural language and Narada generates a Python Agent automatically. Also available via
/agentMaker in chat.Imitation Learning
Record your browser actions while narrating, and Narada generates a workflow from the recording.
From Template
Start from a pre-built template and customize it for your needs.
From Scratch
Build a GUI workflow or Python Agent manually from a blank canvas.
Getting Started
Click Create
Click the + Create button to see all creation options: GUI Agent, Python Agent, Agent Maker, Imitation Learning, and templates.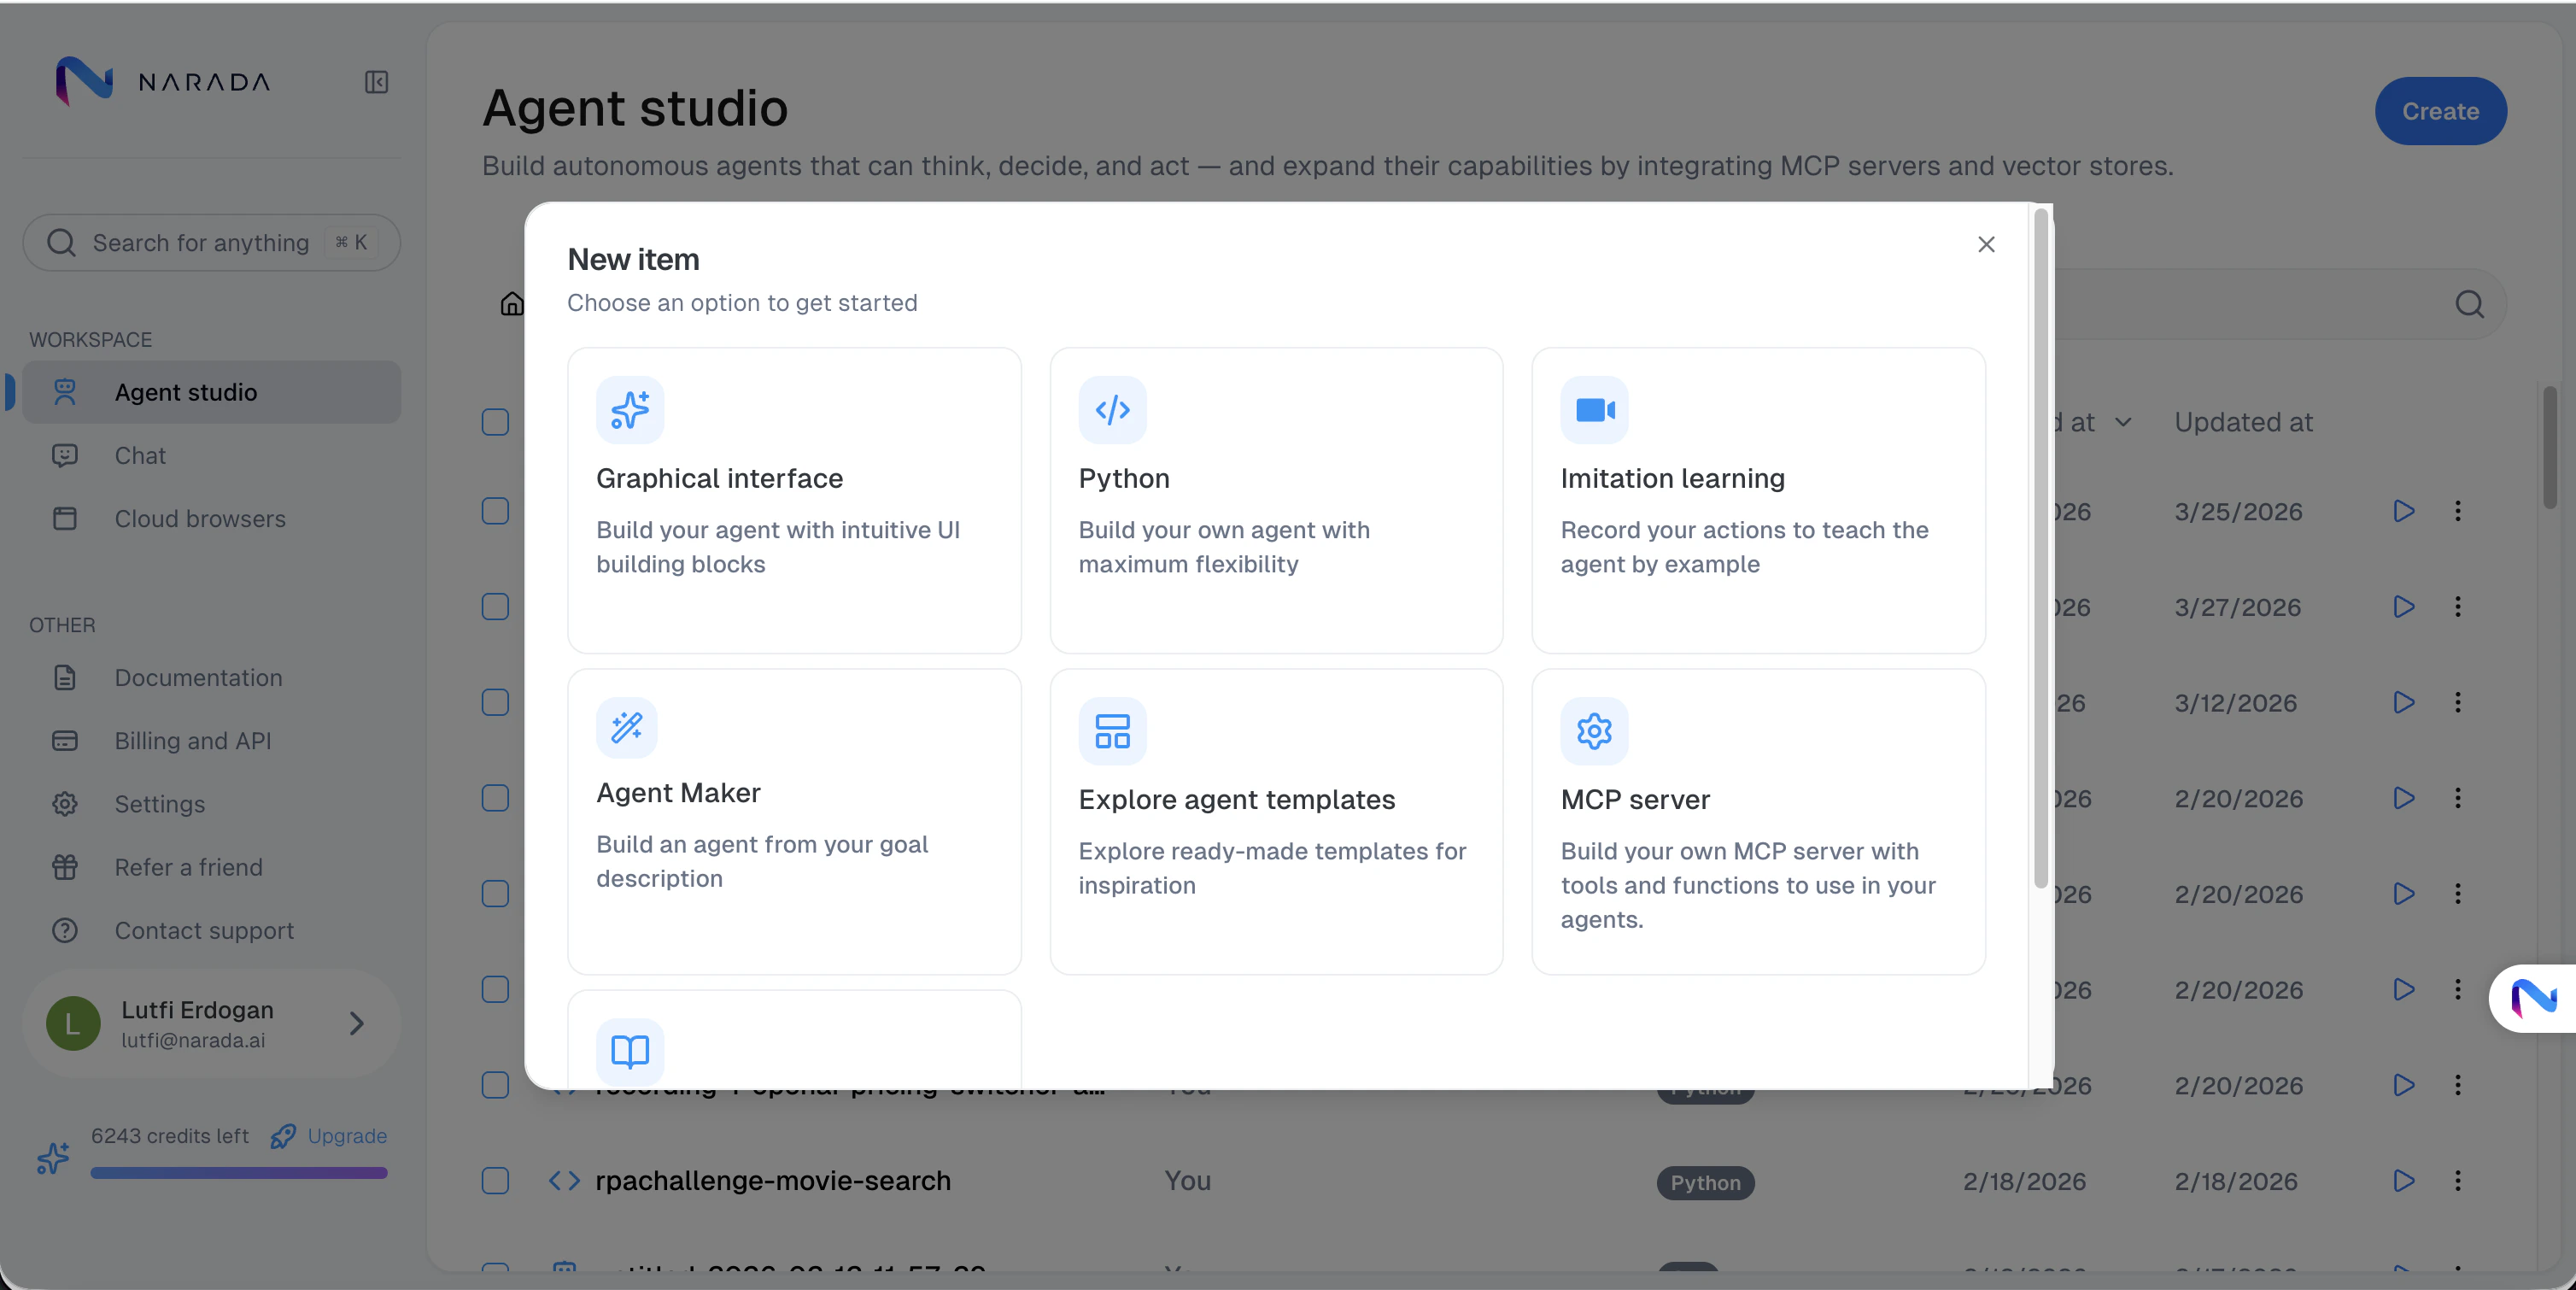
Choose your method
Select the creation method that best fits your needs. For first-time users, we recommend starting with Agent Maker.
Organizing Your Work
Agent Studio provides file-system-like organization:- Folders: Group related agents, MCP servers, and vector stores
- Drag and drop: Reorder items and move them between folders
- Rename: Give descriptive names to your items
- Copy and move: Duplicate items or move them to different locations
Sharing Agents
Share your agents with team members:- Share by email: Invite specific users to access your agents
- Public sharing: Make an agent publicly accessible via a link
- Access requests: Team members can request access to agents you own
- Shared folders: Organize shared items in dedicated folders
GUI Agent Workflows
The GUI Agent editor lets you build visual, step-by-step workflows:Step Types
GUI workflows are built by chaining together steps. The two most-configured step types are documented below; workflows also support control-flow steps (loops and conditionals) for branching and iteration.Agent Steps
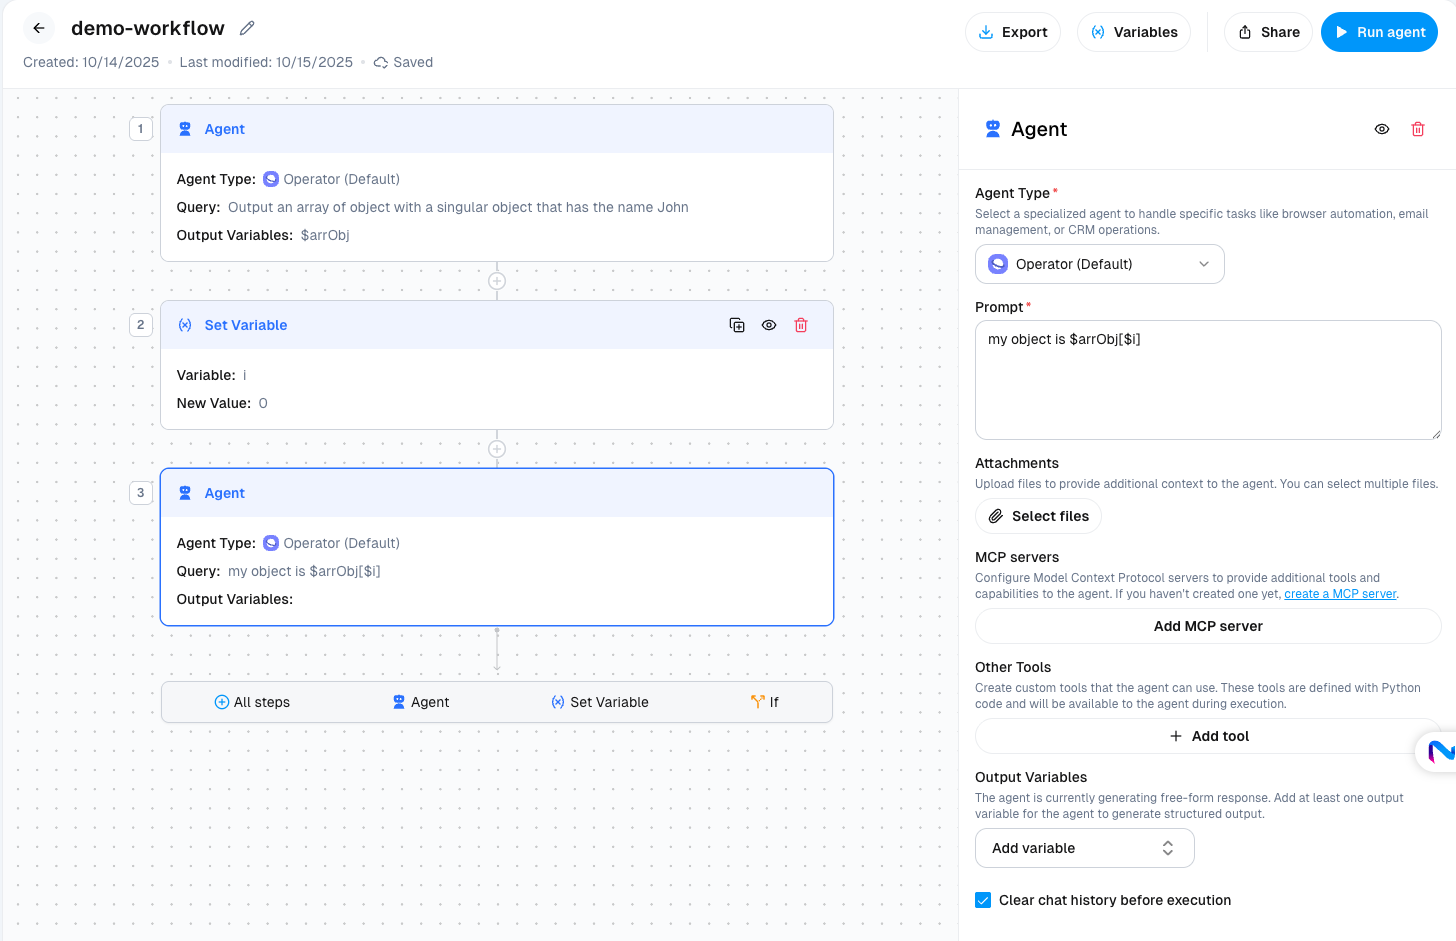
Prompt
The natural language instruction that tells the agent what to accomplish in this step. Be specific and clear about the expected outcome.Agent Type
Select the specialized agent for your task:Operator
Web automation: clicks, navigation, form filling, and data extraction
Core Agent
Read-only observation: extract visible data, answer questions about page content, and web searches without taking browser actions
Attachments
Upload files to provide additional context to the agent. You can select multiple files that the agent will use to inform its actions.Attachments are useful for providing reference documents, data files, or examples that the agent should consider during execution.
MCP Servers
Configure Model Context Protocol servers to provide additional tools and capabilities to the agent. Paste the URL of your MCP server to give the agent access to all tools within that server during this step’s execution.Learn more about MCP
Create custom tools for your agents using the MCP Builder
Vector Stores
Add vector stores to provide context and knowledge to your agent. When the agent needs information, it will automatically retrieve relevant content from your vector stores using semantic search to answer questions and make informed decisions.Learn more about Vector Stores
Create vector stores to store documents and knowledge for your agents
Other Tools
Create custom Python tools directly within the agent step. These tools are defined with Python code and will be available to the agent during execution.When to use Other Tools vs MCP Servers
When to use Other Tools vs MCP Servers
- Other Tools: Quick, one-off functions specific to this agent workflow
- MCP Servers: Reusable tool collections you want to share across multiple workflows
Output Variables
Define structured outputs that the agent should extract during this step. Output variables allow you to capture specific data that can be referenced in subsequent steps. Example use case:- Step 1 outputs:
$jobListings(array of job postings) - Step 2 references:
"Analyze each job in {{$jobListings}} and extract requirements"
Additional Options
Clear chat history before execution
Clear chat history before execution
Enable this option to start the step with a clean slate, removing context from previous steps. Useful when you want to prevent context bleed between unrelated tasks.
This is checked by default in the UI to ensure each step starts fresh.
Python Code Steps
Python Code steps run inline Python as part of your workflow. Use them to transform data between steps, compute derived values, or implement deterministic logic that doesn’t need an LLM.Python Code steps are different from the Other Tools option inside an Agent step. Other Tools are Python functions the LLM can choose to call mid-step; a Python Code step is its own step in the workflow that always runs when reached.
Passing Variables In and Out
Python Code steps expose a specialvariables dictionary that bridges your Python code with the workflow’s variables:
- Read workflow variables with
variables.get("varName")orvariables["varName"] - Write workflow variables by assigning:
variables["varName"] = newValue
variables dictionary. See Input Variables for how to declare and pass them when invoking a custom agent.
Output
Anything your code prints to stdout is captured and shown in the run’s chat as the step’s output, which makesprint() a quick way to surface progress or debugging info.
Building Complex Workflows
Variable References
Pass data between steps using variable syntax:- Simple Variables
- Array Elements
- Object Properties
Reference output from a previous step:
Example Workflow
Here’s a complete example of a multi-step agent workflow:Step 1: Search for jobs
Prompt:
Output Variables:
The agent searches job boards and extracts structured data.
"Search for software engineering jobs in Berkeley and extract the top 5 listings"Output Variables:
$jobListingsThe agent searches job boards and extracts structured data.
Step 2: Analyze requirements
Prompt:
Output Variables:
The agent processes each job listing and extracts skills.
"For each job in {{$jobListings}}, analyze the requirements and identify required skills"Output Variables:
$skillsAnalysisThe agent processes each job listing and extracts skills.
Best Practices
Clear Prompts
Write specific, actionable prompts that clearly state the expected outcome for each step
Structured Outputs
Use output variables to extract structured data that subsequent steps can reliably reference
Modular Steps
Break complex tasks into smaller, focused steps for better reliability and debugging
Context Management
Use “Clear chat history” strategically to prevent context overload in long workflows
Common Use Cases
Research & Data Collection
Research & Data Collection
Build workflows that search multiple sources, collect data, analyze findings, and generate comprehensive reports.Example steps:
- Search academic databases for papers
- Extract key findings from each paper
- Synthesize findings into a summary report
Multi-step Form Filling
Multi-step Form Filling
Create workflows that gather information from various sources and fill out complex forms across multiple pages.Example steps:
- Extract data from uploaded documents
- Navigate to form website
- Fill out multi-page form with extracted data
- Verify submission and capture confirmation
Data Processing Pipelines
Data Processing Pipelines
Build pipelines that fetch data, transform it, validate it, and output it in a specific format.Example steps:
- Fetch data from API using MCP tool
- Transform and clean data
- Validate against business rules
- Export to desired format
Decision-making Workflows
Decision-making Workflows
Create workflows that analyze information, make decisions based on criteria, and take appropriate actions.Example steps:
- Gather relevant data
- Analyze against decision criteria
- Branch based on analysis (using If conditions)
- Execute appropriate action