> ## Documentation Index
> Fetch the complete documentation index at: https://docs.narada.ai/llms.txt
> Use this file to discover all available pages before exploring further.
# MCP Builder
> Create custom tools for your agents using the Model Context Protocol (MCP) builder
## What is the MCP Builder?
The MCP Builder allows you to create custom code tools that extend your agent's capabilities. Using the Model Context Protocol (MCP), you can define Python functions with specific input schemas that your agents can call during execution.
MCP (Model Context Protocol) is a standardized way to provide tools and
context to AI agents. Narada's MCP Builder makes it easy to create, manage,
and share custom tools without writing boilerplate code.
## How It Works
With the MCP Builder, you can create custom Python functions with defined input schemas that perform specific tasks—from API calls to data processing to complex computations. Add multiple tools to a single MCP server, each with its own name, description, and input schema. Once configured, copy the MCP URL and paste it into any agent step in the Agent Studio to give your agent access to all tools in that server.
Build Python functions with custom logic and input schemas
Copy the server URL to use across multiple agent workflows
Agents automatically gain access to all tools in the MCP server
## Video Demo
Watch this video to see a complete walkthrough of creating an MCP server, building a custom tool, attaching it to an agent, and running the agent:
## Creating a Code Tool
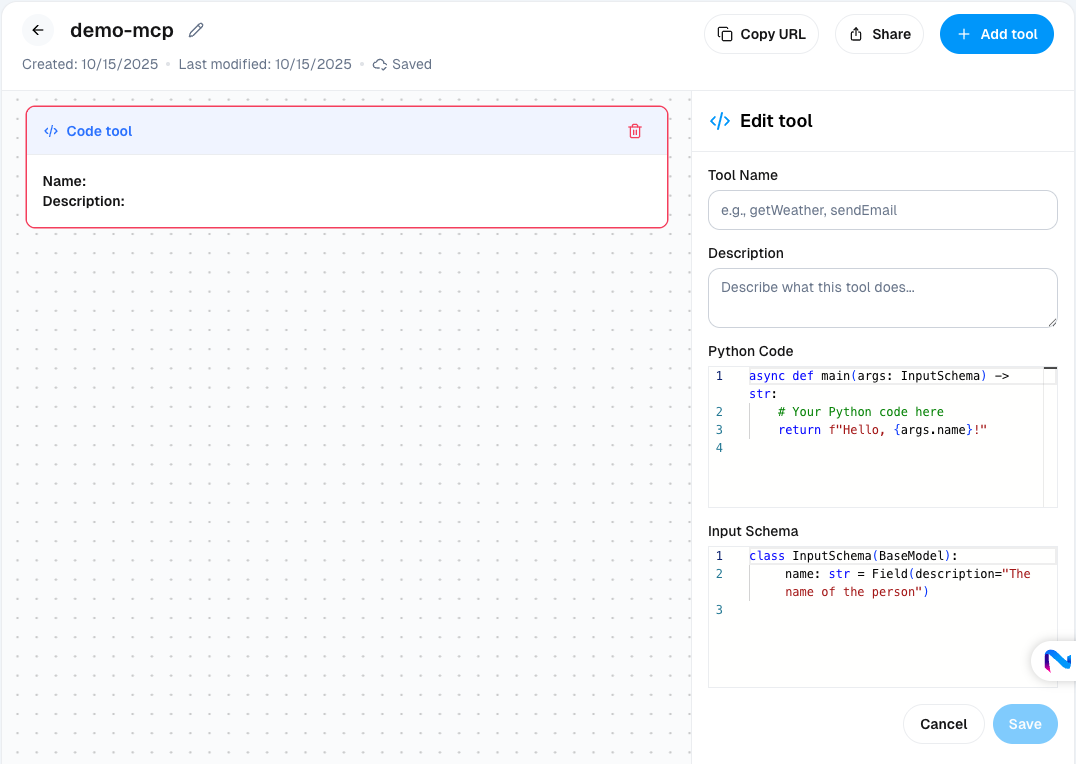
Each code tool consists of four main components:
A clear, descriptive name for your tool (e.g., `getWeather`, `sendEmail`, `calculateROI`). This is how the agent will reference the tool.
Explain what the tool does and when to use it. The agent uses this description
to determine when to call your tool, so be specific and clear.
Write descriptions from the agent's perspective. Instead of "This tool gets
weather", write "Use this tool to retrieve current weather conditions for a
specific location."
The actual function implementation. Your code should:
* Accept parameters defined in the Input Schema
* Return a string result that the agent can understand
* Handle errors gracefully
```python theme={null}
async def main(args: InputSchema) -> str:
# Your Python code here
return f"Result: {args.field_name}"
```
Define the parameters your tool accepts using Pydantic models. This ensures type safety and provides clear documentation for the agent.
```python theme={null}
class InputSchema(BaseModel):
name: str = Field(description="The name of the person")
age: int = Field(description="The person's age")
```
## Example: Building a Weather Tool
Here's a complete example of creating a weather lookup tool:
```python Python Code theme={null}
async def main(args: InputSchema) -> str:
import requests
# Call weather API
response = requests.get(
f"https://api.weather.com/v1/current",
params={"location": args.location}
)
data = response.json()
return f"Weather in {args.location}: {data['temp']}°F, {data['conditions']}"
```
```python Input Schema theme={null}
class InputSchema(BaseModel):
location: str = Field(description="City name or ZIP code")
```
**Tool Name:** `getWeather`
**Description:** Use this tool to retrieve current weather conditions for any location. Provide a city name or ZIP code.
## Using MCP Tools in Agent Studio
Once you've created your MCP server with custom tools, you can add it to any agent step in Agent Studio:
If you're using an MCP server built within Narada, click the **Copy URL** button in the top-right corner of the MCP Builder to copy the server URL to your clipboard.
The URL will be copied to your clipboard automatically. You'll paste this URL in the next step.
In any Agent step, find the **MCP servers** section and click the **Add MCP server** button.
In the popup dialog, enter the following information:
* **URL**: Paste the MCP server URL you copied (or enter the URL for external MCP servers) (required)
* **Label**: An optional label to identify the server
* **Description**: An optional description for the server
* **Authentication**: Select the authentication method if required (or leave as "None")
Only use MCP servers you trust and verify. Ensure the URL and authentication credentials are correct.
Click **Connect** to establish a connection to the MCP server.
You'll be shown a screen displaying all available tools from the MCP server. Select the tools you want to expose to the agent for this step.
If the URL or authentication is malformed, you'll see an error message instead of the tool selection screen. Verify your configuration and try again.
Click **Connect** again to finalize the connection. The MCP server will appear in the list of MCP servers connected to the agent step.
You can add multiple MCP servers to a single agent step, giving your agent
access to a wide range of custom capabilities.
## Best Practices
Write tool descriptions that clearly explain when and how to use each tool. The agent relies on these descriptions to make decisions.
Always define comprehensive input schemas with field descriptions. This
prevents errors and improves agent reliability.
Include try-catch blocks in your code to handle failures gracefully and return
meaningful error messages.
Create focused tools that do one thing well, rather than large multi-purpose functions. This makes them easier to maintain and reuse.
## Common Use Cases
Create tools that call external APIs to fetch data, send notifications, or trigger actions in third-party services.
```python theme={null}
async def main(args: InputSchema) -> str:
response = requests.post(
"https://api.service.com/endpoint",
json={"data": args.data},
headers={"Authorization": f"Bearer {args.api_key}"}
)
return response.json()["result"]
```
Build tools that transform, analyze, or validate data before passing it to the next step.
```python theme={null}
async def main(args: InputSchema) -> str:
import pandas as pd
df = pd.DataFrame(args.data)
summary = df.describe()
return summary.to_string()
```
Implement company-specific calculations, validations, or workflows that your agents need to perform.
```python theme={null}
async def main(args: InputSchema) -> str:
# Custom pricing calculation
base_price = args.quantity * args.unit_price
discount = base_price * args.discount_rate
total = base_price - discount
return f"Total: ${total:.2f} (Discount: ${discount:.2f})"
```
 Each code tool consists of four main components: